Blobfuse API calls to Blob Storage
TL;DR
This article demonstrates how to intercept and analyze API calls made by Blobfuse2 when mounting Azure Blob Storage containers, especially in environments with virtual directories. By using mitmproxy and testing different caching configurations, you can significantly reduce the number of API calls, optimize performance, and lower costs. Key takeaways:
- Use large timeout values for caching layers to minimize API calls
- Prefer flat container structures when possible
- Blobfuse2 translates file system operations into Blob Storage API calls, which can be costly if not configured properly
- Monitoring API calls helps identify performance bottlenecks and cost drivers
Context
We are using blobfuse2 to mount Azure Blob Storage containers as file systems on AKS (Azure Kubernetes Service) pods, using the Azure Blob storage Container Storage Interface (CSI) driver.
From the start, we were aware that we should configure the different caching options available in Blobfuse, as described in the official documentation, to avoid excessive API calls to Blob Storage, which can lead to increased costs and performance issues. So we spent some time testing different configurations in our development environment.
However, after deploying our application to production, we noticed that we were incurring high costs due to the large number of API calls to Blob Storage. The Meter under which we saw the increased costs was LRS List and Create Container Operations. To give you more context, we are not using a flat container structure, but rather a tree structure with multiple virtual directories and subdirectories. Moreover, we are not using Azure Data Lake Storage hierarchical namespace as we are using standard Blob Storage accounts.
In this post, I will share how to intercept and analyze the API calls made by Blobfuse to Blob Storage, and shed light on the importance of container tree structures and caching configurations to optimize performance and reduce costs.
Intercepting API calls with Azure Storage Explorer
Setup
To analyze the API calls made by Blobfuse to Blob Storage, we will use a few tools:
- mitmproxy: an amazing open-source proxy that allows us to intercept and inspect HTTP and HTTPS traffic.
- uv optional: to install mitmproxy.
- blobfuse2: the new version of Blobfuse, which includes several improvements and new features.
- go optional: the programming language used to upload files to Blob Storage.
Given that our local blobfuse process will proxy requests via mitmproxy, we need to ensure that the former trusts the latter’s certificate. Since we are using a Linux host, we can copy the mitmproxy certificate to the system’s trusted certificates directory:
1
2
sudo cp ~/.mitmproxy/mitmproxy-ca-cert.pem /usr/local/share/ca-certificates/mitmproxy-ca-cert.crt
sudo update-ca-certificates
Next, we can start mitmproxy in regular mode, listening on port 8080 (the default mode and port):
1
uvx mitmproxy
In another terminal, we can start blobfuse2. For these tests, we will use the following configuration:
Show YAML configuration
# Daemon configuration
foreground: false # run blobfuse2 in foreground or background

# Common configurations
allow-other: true # allow other users to access the mounted directory - used for FUSE and File Cache
disable-kernel-cache: false # disable kernel cache but keep blobfuse2 cache. Default - false

# Dynamic profiler related configuration. This helps to root-cause high memory/cpu usage related issues.
dynamic-profile: true # allows to turn on dynamic profiler for cpu/memory usage monitoring. Only for debugging, shall not be used in production
profiler-port: 6060 # port number for dynamic-profiler to listen for REST calls. Default - 6060
profiler-ip: 127.0.0.1  # IP address for dynamic-profiler to listen for REST calls. Default - localhost

# Logger configuration
logging:
    type: syslog # type of logger to be used by the system. silent = no logger, base = file based logger. Default - syslog
    level: log_debug # log level. Default - log_warning. log_debug will also enable sdk-trace logs

# Pipeline configuration. Choose components to be engaged. The order below is the priority order that needs to be followed.
components:
    - libfuse
    - entry_cache
    # - block_cache
    - file_cache
    - attr_cache
    - azstorage

# Libfuse configuration
libfuse:
    # default-permission: 0777|0666|0644|0444 default permissions to be presented for block blobs
    attribute-expiration-sec: 604700 # time kernel can cache inode attributes (in sec). Default - 120 sec
    entry-expiration-sec: 604700 # time kernel can cache directory listing attributes (in sec). Default - 120 sec
    negative-entry-expiration-sec: 604700 # time kernel can cache attributes of non existent paths (in sec). Default - 120 sec

# Entry Cache configuration
entry_cache:
    timeout-sec: 604800 # cache eviction timeout (in sec). Default - 30 sec

# Disk cache related configuration
file_cache:
    # Required
    path: </path/to/local/disk/cache> # path to local disk cache
    # Optional
    timeout-sec: 604800 # default cache eviction timeout (in sec). Default - 120 sec
    refresh-sec: 604800 # number of seconds after which compare lmt of file in local cache and container and refresh file if container has the latest copy

# Attribute cache related configuration
attr_cache:
    timeout-sec: 604700 # time attributes can be cached (in sec). Default - 120 sec
    no-symlinks: true # to improve performance disable symlink support. symlinks will be treated like regular files.

# Azure storage configuration
azstorage:
    # Required
    type: block # type of storage account to be connected. Default - block
    account-name: <specify your storage account name>
    container: <specify your container name>
    mode: azcli # kind of authentication to be used
    update-md5: false # set md5 sum on upload. Impacts performance. works only when file-cache component is part of the pipeline
    validate-md5: false # validate md5 on download. Impacts performance. works only when file-cache component is part of the pipeline
The key point to notice here is the use of large timeout values for the various caching layers, which significantly helps reduce the number of API calls to Blob Storage. Although logs and the profiler are not required for this test, I’ve enabled them to demonstrate how they can be useful for debugging performance issues.
Optionally, we can create a small Go program to upload files to Blob Storage. We’ll run it twice to simulate two scenarios: one with a flat container structure, and another with a tree structure using virtual directories. The program accepts a single command-line argument to determine whether to use virtual directories, creating files like dir-0/blob-0.txt, dir-1/blob-1.txt, etc. for the tree structure, and blob-0.txt, blob-1.txt, etc. for the flat structure.
Show Go program
package main

import (
	"context"
	"errors"
	"fmt"
	"log"
	"runtime"
	"sync"

	"os"
	"strings"

	"github.com/Azure/azure-sdk-for-go/sdk/azcore"
	"github.com/Azure/azure-sdk-for-go/sdk/azidentity"
	"github.com/Azure/azure-sdk-for-go/sdk/storage/azblob"
)

func main() {

    const (
        storageAccountName = "<your-storage-account-name>"
        containerName      = "<your-container-name>"
    )

    // Get withDirectory from first command-line argument
    var withDirectory bool = false

    if len(os.Args) > 1 {
        arg := strings.ToLower(os.Args[1])
        withDirectory = (arg == "true" || arg == "1" || arg == "yes")
    }
    // Create a new DefaultAzureCredential
    cred, err := azidentity.NewDefaultAzureCredential(nil)
    if err != nil {
        log.Fatalf("Failed to obtain a credential: %v", err)

    }

    // Create a new service client
    url := "https://" + storageAccountName + ".blob.core.windows.net/"
    client, err := azblob.NewClient(url, cred, nil)
    if err != nil {
        log.Fatalf("Failed to create service client: %v", err)
    }

    // Create container if it doesn't exist
    _, err = client.CreateContainer(context.Background(), containerName, nil)
    if err != nil {
        var respErr *azcore.ResponseError
        if errors.As(err, &respErr) && respErr.ErrorCode == "ContainerAlreadyExists" {
            log.Printf("Container %s already exists", containerName)
        } else {
            log.Fatalf("Failed to create container: %v", err)
        }
    }


    numBlobs := 10
    numWorkers := runtime.NumCPU()
    jobs := make(chan int, numBlobs)
    data := make([]byte, 5*1024) // 5 KiB of data
    var wg sync.WaitGroup

    // Start worker goroutines
    for range numWorkers {
        wg.Go(func() {
            for i := range jobs {
                var blobName string
                if withDirectory {
                    blobName = fmt.Sprintf("dir-%d/blob-%d.txt", i, i)
                } else {
                    blobName = fmt.Sprintf("blob-%d.txt", i)
                }

                _, err := client.UploadBuffer(context.Background(), containerName, blobName, data, nil)
                if err != nil {
                    log.Printf("Failed to upload blob %s: %v", blobName, err)
                } else {
                    log.Printf("Successfully uploaded blob %s", blobName)
                }
            }
        })
    }

    // Send jobs to workers
    for i := range numBlobs {
        jobs <- i
    }
    close(jobs)

    wg.Wait()

}
1
2
go run main.go true
go run main.go
Finally, we can mount the Blob Storage container using blobfuse2, using two special environment variables to point to the mitmproxy proxy:
1
HTTPS_PROXY=http://127.0.0.1:8080 HTTP_PROXY=http://127.0.0.1:8080 REQUESTS_CA_BUNDLE=/etc/ssl/certs/ca-certificates.crt blobfuse2 mount <your mount directory> --config-file=<path to your blobfuse2 config file>
First API calls, before accessing any file
As soon as we hit enter, we should start seeing the API calls being intercepted by mitmproxy. Note that we have not requested any file yet, so all these calls are made by blobfuse2 to list the contents of the container and build its internal cache.

There are three list calls (these are HTTP GET requests with a ?comp=list query parameter): one for listing Trash-userID files, another whose purpose is unclear, and a third that lists the first 5000 blobs in the container, requesting both metadata and markers in the root directory. In this last list call (not visible in the screenshot but observable in the mitmproxy UI), the virtual directories are returned with a metadata field <BlobPrefix><Name>, which blobfuse2 uses to build the container’s tree structure.
As shown in the image, blobfuse2 also issues several HTTP HEAD requests, but only to the virtual directories. All of these requests return 404 Not Found, confirming that the virtual directories do not exist as actual blobs, but are simply prefixes within the blob names.
Accessing a file inside a virtual directory
When we access a file inside one of these virtual directories, blobfuse2 generates additional API calls, including a get request to retrieve the file’s contents.

First, we see another list call with the prefix dir-0%2blob-0.txt. Unlike previous list calls, this one does not return the metadata field <BlobPrefix><Name>, but instead returns <Blobs><Blob><Name>dir-0/blob-0.txt, indicating that this is an actual blob and not a virtual directory. Immediately after, there is a get call to retrieve the contents of the blob.
These two calls are followed by several additional list calls, likely for bookkeeping purposes. Remember, blobfuse needs to translate file system operations into Blob Storage API calls, which do not natively support the concept of directories.
Accessing another file in another directory
Trying another file inside a different virtual directory will result in similar API calls:

Just with fewer extra list calls.
If we then try to access a couple of files from the root directory, we will see that blobfuse2 does not make any list calls, just two get calls to retrieve the file contents:

Pressing tab for autocompletion
I would advise against doing this on a container with a large number of blobs, as it may lead to performance issues. I want to show you what happens when I press tab (autocompletion) in a directory. Consider that we have already accessed a file inside that directory, i.e. dir-0.

Here we see a single list call with the prefix dir-0, which returns all the blobs and virtual directories that start with that prefix. This is expected, as blobfuse2 needs to list the contents of the directory to provide autocompletion suggestions. This call will return a maximum of 5000 items, which is a trade-off between performance and completeness.
API calls view from Azure Insights
We can also see these API calls from the Azure Portal, under the Storage Account Monitoring -> Insights section, in the Transactions by API graph:
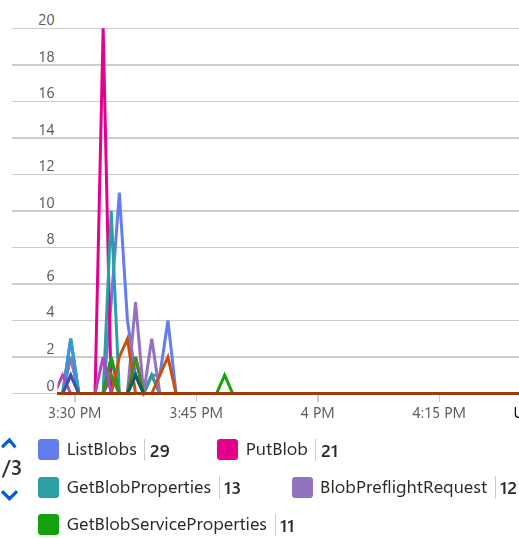
It’s interesting (and a bit scary) to see how many List Blobs, Get Blob (service) Properties, and Get Blob Preflight Requests calls are being made, and we cannot see any Get Blob call, at least from the granularity of this graph. Remember that this is a test container with only 10 blobs and 10 virtual directories, so imagine what would happen in a production container with thousands of blobs and directories.
Conclusion
In this post, we have seen how to intercept and analyze the API calls made by Blobfuse2 to Azure Blob Storage, using mitmproxy as a proxy tool. We have also seen the importance of container tree structures and caching configurations to optimize performance and reduce costs.
Blobfuse2 is a powerful tool optimized for performance, but translating file system operations into Blob Storage API calls can be challenging, especially when dealing with virtual directories and large containers. Therefore, it is crucial to configure blobfuse2 properly, using appropriate caching options and, if possible, a flat directory structure.